Do you remember the first time you tasted a Butterfinger candy bar? The crunch and the peanut buttery flavor were amazing. Now, imagine that taste in a small, no-bake dessert. That’s what this butterfinger balls recipe offers. It’s a sweet treat that brings back childhood memories and satisfies your adult cravings.
Table of contents
Butterfinger balls are the ultimate no-bake treat, delivering crunch, creaminess, and nostalgia in every bite. If you love easy desserts, try our best brookie recipe for another effortless indulgence. Want a sweet-and-savory combo? Pair these treats with our high-protein buffalo chicken dip for a game-day snack that balances flavors perfectly.
These Butterfinger balls are great for any occasion. Whether it’s a party, a surprise for the kids, or a treat for yourself, they’re sure to make you happy. They’re simple to make but impressive to eat. So, get ready to make some magic in your kitchen!
Key Takeaways
- Quick and easy no-bake dessert ready in about 30 minutes
- Makes approximately 30 delicious Butterfinger balls
- Uses only 10 simple ingredients
- Perfect for parties, holiday gatherings, or everyday treats
- Can be stored in the fridge for up to a week
- Each ball contains about 219 calories
- Freezer-friendly for up to 6 months
Why These Butterfinger Balls Are Irresistible
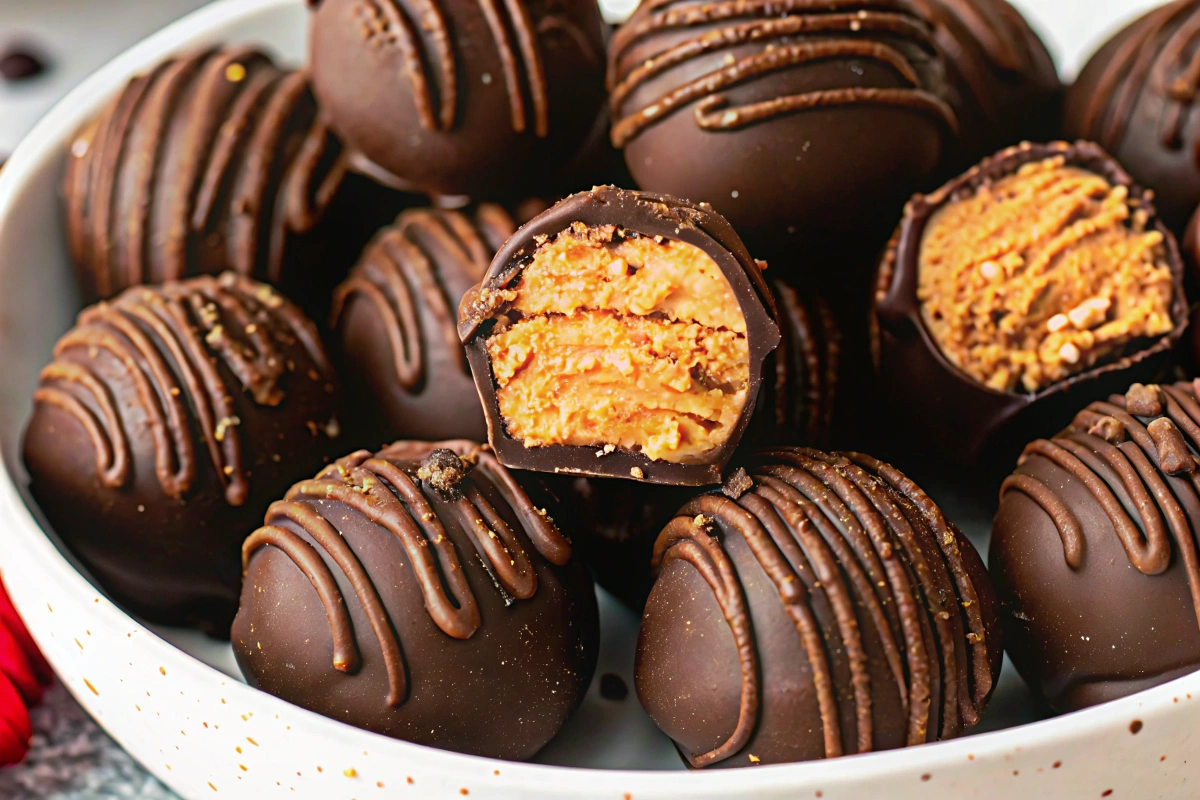
No-Bake Butterfinger Balls Recipe is a hit for a good reason. They mix textures and flavors in a way that’s hard to resist. The creamy peanut butter center, with crushed graham crackers and powdered sugar, is smooth and rich. Adding real Butterfinger pieces gives a nice crunch, just like the candy bar.
This recipe is easy to make. It only takes 15 minutes to prepare and doesn’t need baking. You can make 20-25 treats quickly, perfect for sudden parties or sweet cravings.
Each ball has about 195 calories, making them a tasty treat without guilt. The ingredients are simple: creamy peanut butter, unsalted butter, and powdered sugar. This mix creates a familiar yet exciting taste.
“Every time I bring these to a party, they disappear in minutes! They’re always the first thing gone from the dessert table.”
This No-Bake Butterfinger Balls Recipe is also great because you can change them up. Try different chocolates for coating or add extra toppings. They keep well in the fridge for 2 weeks or in the freezer for 3 months. This makes them ideal for planning ahead or surprise guests.
Essential Ingredients and Equipment
Making this No-Bake Butterfinger Balls Recipe requires tasty ingredients and the right tools. Let’s explore what you’ll need to make these tasty treats.
Key Ingredients List
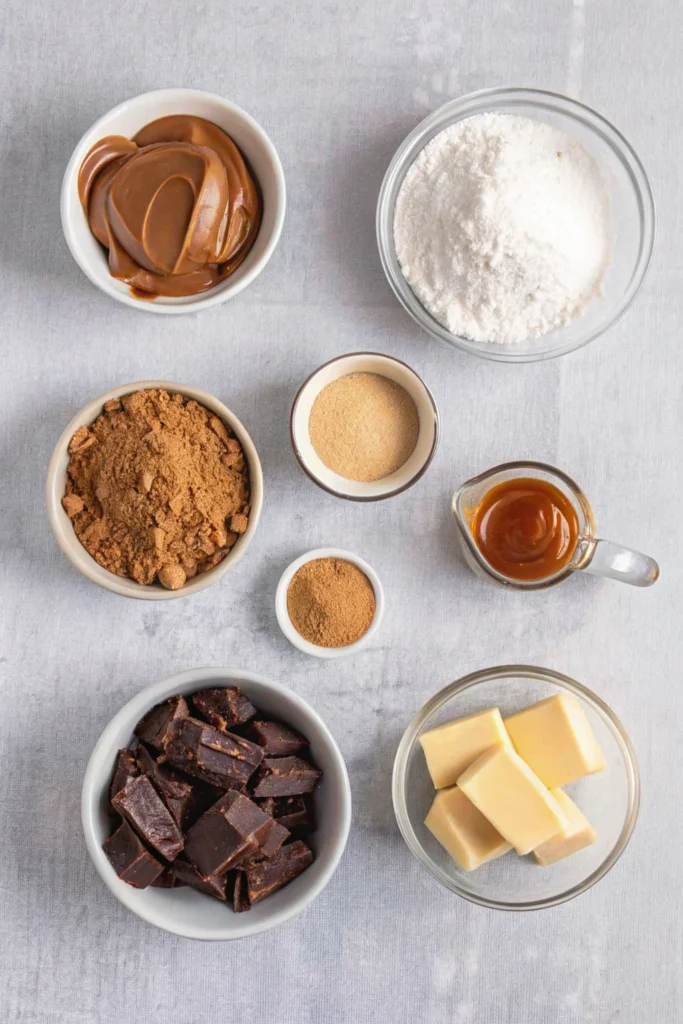
The ingredients for butterfinger balls are simple but key for the perfect taste and texture:
- 1 cup creamy peanut butter
- ½ cup (4 tablespoons) unsalted butter, softened
- 1 teaspoon vanilla extract
- 2 cups powdered sugar, sifted
- 1 cup graham cracker crumbs
- 4 Butterfinger candy bars, crushed
- 12 ounces chocolate bark for coating
Required Kitchen Tools
To make these no-bake treats, you’ll need these tools:
- Electric mixer or stand mixer
- Baking sheet
- Parchment paper
- Microwave-safe bowl
- Measuring cups and spoons
- Mixing bowl
- Fork for dipping
Ingredient Substitutions
You can change the recipe for different diets:
| Original Ingredient | Substitution | Reason |
|---|---|---|
| Graham crackers | Gluten-free graham crackers | For gluten-free option |
| Chocolate bark | Vegan chocolate chips | For dairy-free version |
| Butterfinger bars | Crushed peanut brittle | For homemade alternative |
With these ingredients and tools, you can make 24-30 Butterfinger balls. Each ball has 202 calories, 13g of fat, and 4g of protein. For the best taste, use creamy peanut butter.
Step-by-Step Preparation Guide
Ready to learn how to make butterfinger balls? This butterfinger balls tutorial breaks down the process into simple steps. Let’s dive in!
Making the Base Mixture
Start by creating the delicious core of your No-Bake Butterfinger Balls Recipe. In a large bowl, beat peanut butter, butter, and vanilla extract until creamy. Gradually mix in powdered sugar, scraping the sides as needed. Fold in graham cracker crumbs and crushed Butterfinger candy bars until evenly combined.
Rolling and Shaping
Now comes the fun part! Use a cookie scoop to form 1 ½ tablespoon-sized portions. Roll each portion between your palms to create smooth balls. Place them on a parchment-lined baking sheet and freeze for 30 minutes to set.
Chocolate Coating Process
The final touch is a rich chocolate coating. Melt chocolate bark in a microwave-safe bowl. Use a toothpick or fork to dip each ball into the melted chocolate. Let excess chocolate drip off before placing the coated ball back on the baking sheet.
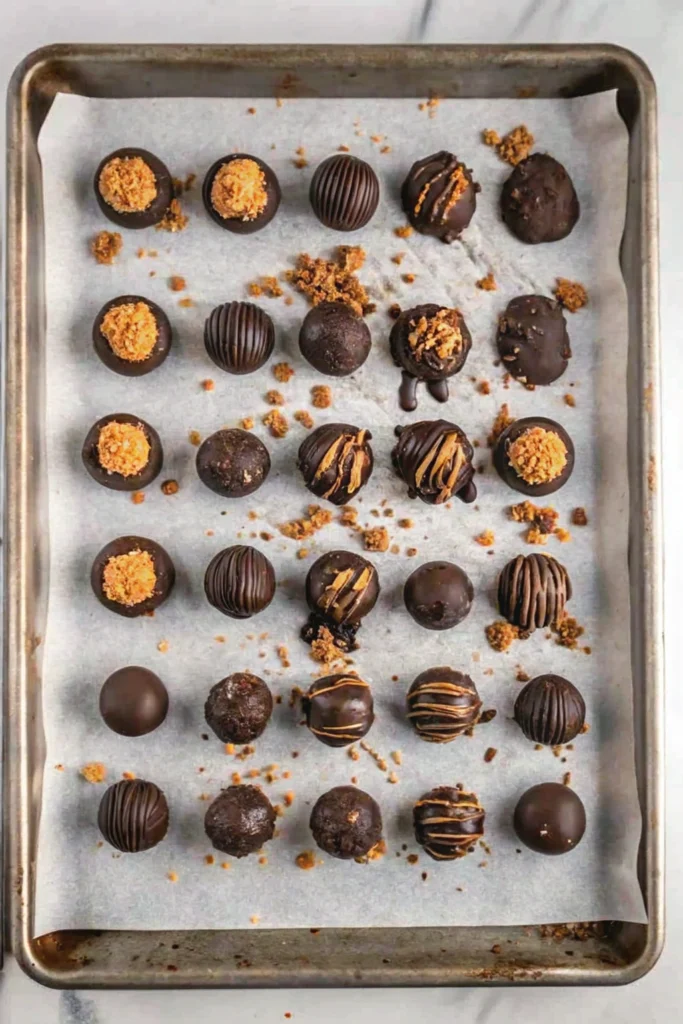
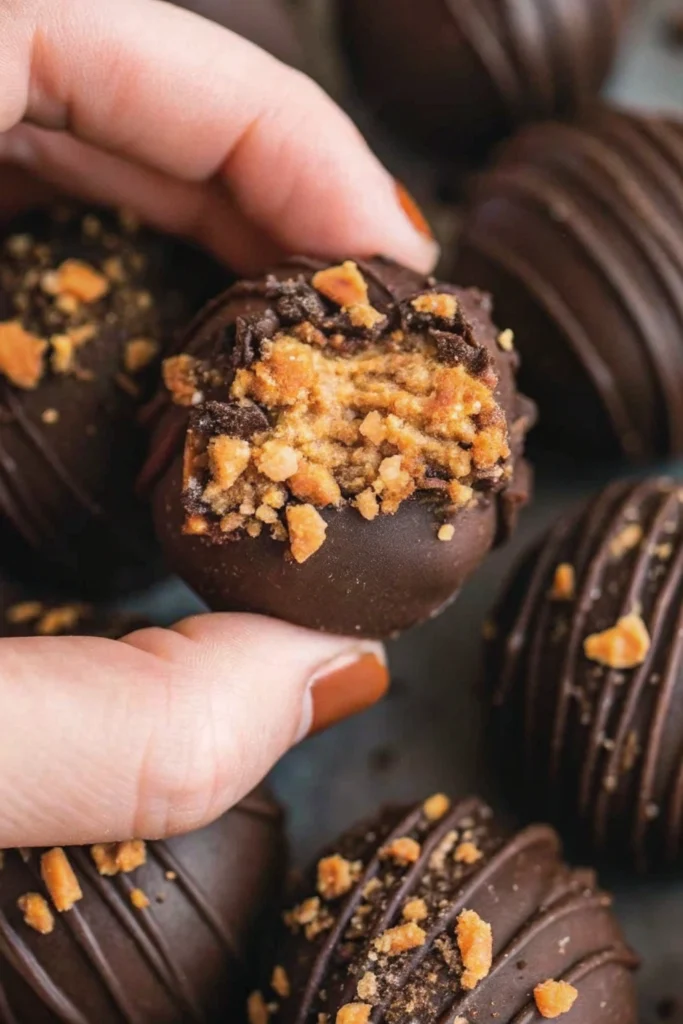
For extra flair, sprinkle crushed Butterfinger pieces on top while the chocolate is still wet. You can also add decorative drizzles for a professional touch.
| Step | Time | Temperature |
|---|---|---|
| Mix base ingredients | 5-7 minutes | Room temperature |
| Shape balls | 10-15 minutes | Room temperature |
| Freeze balls | 30 minutes | 0°F (-18°C) |
| Coat with chocolate | 15-20 minutes | Melted chocolate at 90-92°F (32-33°C) |
With these steps, you’ll create irresistible butterfinger balls that are sure to impress. Enjoy your homemade treats!
How to Store and Serve Your Butterfinger Balls
This No-Bake Butterfinger Balls Recipe is great for parties or holiday gatherings. You can make them ahead of time. They keep well in an airtight container in the fridge for up to a week.
To store them, use wax paper between layers. This keeps them from sticking together. If you need to store them longer, freeze them for up to two months.
| Storage Method | Duration | Tips |
|---|---|---|
| Refrigerator | Up to 1 week | Use airtight container, separate layers with wax paper |
| Freezer | Up to 2 months | Thaw in fridge for a few hours before serving |
When you’re ready to serve, thaw frozen butterfinger balls in the fridge. This keeps their texture and taste perfect. With these tips, you’ll always have these treats ready for guests or cravings.
Creative Variations and Toppings
Discover exciting ways to make butterfinger balls even better. With a few simple changes, you can turn these treats into something special for any event.
Alternative Candy Bar Options
For a fun twist on this No-Bake Butterfinger Balls Recipe, try using different candy bars instead of Butterfingers. Snickers add a nutty caramel flavor, while Heath bars bring a toffee crunch. Reese’s Cups give an extra peanut butter kick. Each choice brings a new taste, keeping things interesting.
Coating Variations
Don’t stick to just semi-sweet chocolate. White chocolate offers a creamy sweetness, and dark chocolate adds a touch of class. For themed parties, use colored candy melts to match the colors. The right mix of 2 cups of chips and 1 tablespoon of shortening makes the perfect coating.
Decorative Finishes
Make your No-Bake Butterfinger Balls Recipe stand out with creative toppings. Crushed graham crackers add texture, and colorful sprinkles bring a festive vibe. Try drizzling contrasting chocolate for a fancy look or dust with edible glitter for sparkle. Let your creativity shine!
| Variation | Coating | Topping |
|---|---|---|
| Snickers | Milk Chocolate | Chopped Peanuts |
| Heath Bar | White Chocolate | Toffee Bits |
| Reese’s Cups | Dark Chocolate | Peanut Butter Drizzle |
These creative toppings not only taste great but also look amazing. With so many ways to make butterfinger balls, you’ll always have something new to impress your guests.
Perfect for Special Occasions
Butterfinger balls are the ultimate desserts for special events. They are perfect for parties, from casual get-togethers to formal affairs. They are a hit at baby showers, birthdays, and even weddings.
What’s great is you can make these butterfinger balls for parties days in advance. This is a lifesaver during busy times. With just 45 minutes of prep time and no baking needed, you’ll have a crowd-pleasing treat ready to go.
These sweet bites are always the first to vanish at gatherings. Their irresistible taste and convenient size make them a favorite. Each ball, about 1 ½ tablespoons in size, packs a punch of flavor that keeps guests coming back for more.
| Event Type | Presentation Idea | Storage Tip |
|---|---|---|
| Baby Shower | Arranged in the shape of a baby rattle | Refrigerate up to 1 week |
| Birthday Party | Stacked in a colorful tiered display | Freeze up to 2 months |
| Wedding | Elegant platter with edible gold dust | Make 2-3 days ahead |
For those with dietary restrictions, these treats are easily adaptable. Try using gluten-free crackers or dairy-free chocolate to cater to different needs. This flexibility ensures everyone at your event can enjoy these delightful desserts.
Pro Tips for Perfect Results
Mastering the art of making butterfinger balls is key to perfecting homemade desserts. Let’s dive into some expert tips for making butterfinger balls that will elevate your treat-making skills.
Texture Management
Getting the right texture is crucial. If your mixture feels too soft, pop it in the fridge for 15 minutes before rolling. This will make shaping easier and result in neater balls. For a crunchier texture, add an extra 1/4 cup of crushed Butterfinger bars to your mix.
Chocolate Melting Guide
Melting chocolate can be tricky. Use 30-second bursts in the microwave, stirring between each. This method prevents overheating and ensures smooth, glossy chocolate. For even coating, a fork works better than a toothpick when dipping your balls.
Troubleshooting Common Issues
If your balls are falling apart when dipped, they might be too warm. Chill them for an extra 10 minutes before coating. For uneven chocolate coating, tap the fork gently on the bowl’s edge to remove excess chocolate.
| Issue | Solution |
|---|---|
| Too soft mixture | Chill for 15 minutes |
| Chocolate seizing | Add 1 tsp vegetable oil |
| Uneven coating | Tap fork on bowl edge |
Remember, practice makes perfect. With these tips for making butterfinger balls, you’ll be perfecting homemade desserts in no time. Happy baking!
Making Butterfinger Balls with Kids
Make Butterfinger balls a fun activity for the whole family! Kids enjoy crushing candy bars and shaping the mix into balls. It’s a great way to teach them about baking while making memories.
Younger kids can measure ingredients or crush the candy bars. Older kids can melt the chocolate and coat the balls. Always watch them closely, especially with hot ingredients.
This recipe is perfect for teaching kitchen skills:
- Measuring ingredients accurately
- Following step-by-step instructions
- Learning about food safety and hygiene
Be ready for some mess, but it’s all part of the fun! Use parchment paper to cover your workspace for easy cleaning. Let kids add their own touches like sprinkles, nuts, or coconut flakes.
Family baking activities like this boost creativity and confidence in the kitchen. With just 20 minutes of prep and making 36 balls, it’s quick and rewarding. Store leftovers in the freezer for up to 2 months – if they last that long!
Dietary Adaptations
Craving gluten-free butterfinger balls or vegan dessert balls? You’re in luck! These tasty treats can be made to fit many diets without losing flavor or texture.
Gluten-Free Version
To make gluten-free butterfinger balls, use gluten-free graham crackers instead. Make sure the peanut butter and chocolate chips are gluten-free too. This easy swap lets everyone enjoy these crunchy treats.
Vegan Modifications
Making vegan dessert balls is easy. Use dairy-free chocolate chips and vegan butter. Plant-based milk is a great substitute for regular milk. These changes keep the taste the same but make the treats vegan-friendly.
Allergy-Friendly Options
For nut allergies, use sunflower seed butter instead of peanut butter. If soy is a problem, choose soy-free chocolate chips. Always check labels to avoid cross-contamination and meet specific allergy needs.
| Dietary Need | Ingredient Swap | Preparation Time |
|---|---|---|
| Gluten-Free | Gluten-free graham crackers | 15 minutes |
| Vegan | Dairy-free chocolate, vegan butter | 20 minutes |
| Nut Allergy | Sunflower seed butter | 15 minutes |
With these changes, you can make treats for everyone. Sharing desserts that fit all diets is priceless. The recipe takes about 15 minutes to prepare, and these tweaks add just a bit more time.
Gifting and Presentation Ideas
Make your dessert gifts stand out with these delicious Butterfinger balls. Homemade treats have a personal touch that store-bought ones can’t beat. Wrap them in decorative tins or cellophane bags with festive ribbons for a stunning look.
Leave a lasting impression by adding a handwritten recipe card. This thoughtful touch lets the recipient make the treat themselves, creating a special memory. For an extra special touch, design custom labels that fit the occasion or the recipient’s style.
When moving your Butterfinger balls, use strong containers with parchment paper inside. This keeps them fresh and looking great, whether you’re off to a party or gifting them to a host.
“There’s something magical about sharing homemade treats during the holidays. My friends start asking about these Butterfinger balls as soon as December hits!”
For a seasonal touch, pick themed packaging. Use red and green for Christmas, pastels for Easter, or orange and black for Halloween. This shows you’ve thought of every detail, making your gift even more special.
- Use decorative tins or cellophane bags
- Include handwritten recipe cards
- Create custom labels
- Choose seasonal packaging
- Use sturdy containers for transport
By focusing on presentation, you turn a simple dessert into a memorable gift. Your Butterfinger balls will become a holiday tradition that everyone looks forward to.
FAQs
How long do Butterfinger balls last in the refrigerator?
Butterfinger balls can stay fresh for up to 2 weeks in the fridge. For the best taste, eat them within a week.
Can I freeze Butterfinger balls?
Yes, you can freeze them for up to 3 months. Use a freezer-safe container and separate layers with wax paper. Thaw in the fridge before eating.
What can I use instead of graham crackers for a gluten-free version?
For a gluten-free option, use gluten-free graham crackers or crushed gluten-free cookies. You can also try finely ground almond flour.
How can I make vegan Butterfinger balls?
Use vegan butter and dairy-free chocolate for coating. Make sure your candy bar substitute is vegan. You can make a vegan “Butterfinger” crunch with corn flakes, peanut butter, and maple syrup.
What’s the best type of chocolate to use for coating?
High-quality chocolate melting wafers or chocolate bark work best. They melt smoothly and set well, making a great coating for your Butterfinger balls.
Can I use natural peanut butter in this recipe?
Natural peanut butter can change the texture of your Butterfinger balls. For the best results, use creamy, commercial peanut butter that doesn’t separate.
How do I prevent the chocolate from seizing when melting?
Avoid water when melting chocolate. Use short 15-30 second intervals in the microwave, stirring between each. Or, use a double boiler for better control.
What’s the best way to crush Butterfinger bars?
Crush Butterfinger bars in a resealable plastic bag with a rolling pin or meat mallet. This keeps the mess contained and makes crushing easy.
Can I make these without an electric mixer?
Yes, you can make Butterfinger balls without an electric mixer. Mix with a sturdy wooden spoon or spatula. It takes more effort, but they taste great.
How can I make these nut-free for allergies?
Replace peanut butter with sunflower seed butter or cookie butter for nut-free balls. Make sure all ingredients, including candy bars, are nut-free.
Conclusion
Homemade Butterfinger balls are perfect for any event. You can make 24-30 treats in just 30 minutes. They mix the crunch of Butterfinger bars with creamy peanut butter and chocolate.
This recipe is very flexible. You can keep them at room temperature for a week, in the fridge for two weeks, or freeze for three months. It’s great for planning ahead or when guests drop by. With simple ingredients like crushed Butterfingers, peanut butter, and chocolate chips, you’ll make a dessert that’s just as good as the original.
Feel free to get creative! Try using dark chocolate for coating or add rice krispies for more crunch. These homemade Butterfinger balls are a hit whether for a party or a family treat. So, get your ingredients ready and start making them. Your taste buds will love you for it!